The content in this guide is currently being revised to align with the new user interface. Some text and images may be outdated.
Integrating your Microsoft 365 and Accelo Accounts
Accelo's Microsoft 365 integration makes it easy for you and your team to stay up to date by syncing all of your work automatically. NOTE: This integration was previously known as the Office 365 integration.
Using the Microsoft 365 integration guide, you can:
- Understand everything that syncs between Accelo and Microsoft 365
- Connect your Accelo account to your Microsoft 365 account
- Sync your email with Accelo
- Sync your calendar with Accelo
- Sync your contacts with Accelo
- Sync your tasks with Accelo
Understand everything that syncs between Accelo and Microsoft365
Email
|
Accelo Field |
Microsoft 365 Field |
|
Email Subject |
Subject |
|
Email Body |
Body |
|
Email Attachments |
Attachments |
|
Email "TO" recipients |
"TO" recipients |
|
Email "CC" recipients |
"CC" recipients |
|
Email "BCC" recipients |
"BCC" recipients |
Calendar Events
|
Accelo Field |
Microsoft 365 Field |
|
Meeting Subject |
Title |
|
Meeting Body |
Description |
|
Meeting Location |
Location |
|
Start Date & Time |
Start Date & Time |
|
End Date & Time |
End Date & Time |
|
Attendee Email Addresses |
Attendee Email Addresses |
|
Visibility |
Visibility |
|
Priority |
Priority |
Contacts
|
Accelo Field |
Microsoft 365 Field |
|
First Name |
First Name |
|
Middle Name |
Middle Name |
|
Last Name |
Surname |
|
Title |
Title |
|
Company Name |
Company |
|
Contact Comments |
Notes |
|
|
Email Address |
|
Phone |
Phone |
|
Mobile |
Mobile/Cell |
|
Job Title |
Job Title |
|
Physical Address |
Business Address |
Tasks
|
Accelo Field |
Microsoft 365 Field |
|
Task Title |
Subject |
|
Task Description |
Description |
|
Planned Due Date |
Due Date |
|
Status |
Status (Complete or Incomplete) |
|
Start Date |
Started Date |
|
Completed Date |
Completed Date |
Connecting your Accelo and Microsoft 365 accounts
To connect your Microsoft 365 account to Accelo, follow these simple steps:
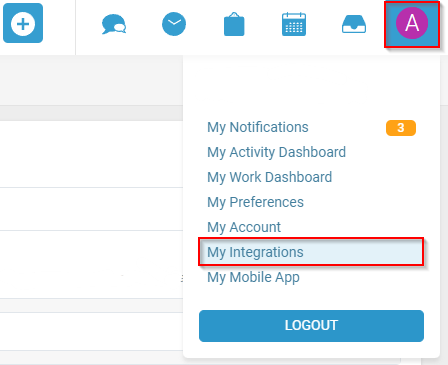
-
Open your Integrations page. This can be found in the dropdown menu after clicking on your User Profile Icon, which is located in the top right-hand corner of every page in Accelo.
-
Click the Microsoft 365 tab, and click Connect your Microsoft 365 account.

-
Log in to your Microsoft 365 account. You're all done!
Transitioning from the Exchange Integration to Using Microsoft 365
If you use Microsoft 365 to host your email, then you may have previously connected your account to Accelo using our Exchange integration method. You'll want to move across to the newer connection method.
To make the transition, follow these simple steps:
- Open your Integrations page - located under your icon in the top right-hand corner of every page in Accelo
- It’s likely that your user account is still connected to Exchange. If so, select that tab from the left and hit disconnect.
- Select the newly-available Microsoft 365 tab, and click Connect.
Important note: An admin user must be the first to integrate with Microsoft 365 whilst your team are also using the older Exchange connection method. Once you connect, this will trigger the older Exchange users to be disconnected. - To complete the connection, you will need to login to your Microsoft 365 account in the same browser.
- As per the note above, you’ll want to ask the rest of your team to now re-connect using the new Microsoft 365 option.
A few more important details to be aware of:
- Only administrators can begin the transition
For companies which have previously used the Exchange integration, only an Accelo administrator can begin the transition to the Microsoft 365 integration. Once an administrator has begun the process by connecting their Microsoft 365 account, the integration will become available to all users. For companies which have not previously used the Exchange integration, there is no restriction on who can connect the Microsoft 365 integration.
-
The transition from Exchange to the Microsoft 365 integration is a one-way process
The Exchange and Microsoft 365 integrations offer similar tools for syncing your calendar with Accelo to make it easy to manage your schedule and log your time. However, the structure that the integrations use to keep track of those events is different. When you connect the Microsoft 365 integration, any meetings which were previously synced via the Exchange integration will be converted into the new Microsoft 365-friendly format, ensuring that your existing meetings continue to sync now and in the future. However, these meetings can not be converted back from the Microsoft 365 to Exchange format. It is therefore not possible to transition back from the Microsoft 365 integration to using Exchange. -
Your entire team must make the transition
In addition to your meetings with clients, the Exchange and Microsoft 365 integrations also offer the ability to sync your internal meetings to make it easy to keep track of the internal work that you do. That means that you'll often have meetings synced with Accelo that include your colleagues and integrates with their calendar as well as yours. Because the transition from Exchange to Microsoft 365 automatically converts your meetings into an Microsoft 365-friendly format, these meetings will no longer sync with your team's calendar via the Exchange integration.To prevent this process from creating duplicate meetings, the Exchange integration will automatically stop syncing calendars with any of your team once the Microsoft 365 integration is connected. In order to continue syncing calendars, your team will need to make the transition from Exchange to the Microsoft 365 integration.
Syncing your incoming and outgoing emails with Accelo
Connecting your Microsoft 365 account allows you to automatically sync your Microsoft 365 emails with Accelo. The integration will automatically sync emails in your Inbox and Sent Items folders with Accelo.
To begin syncing your email, simply enable these two settings:

-
Email Incoming Sync: Syncs emails from your Inbox folder in Microsoft 365 with Accelo.
-
Email Outgoing Sync: Syncs emails from your Sent Items folder in Microsoft 365 with Accelo.
How often does Accelo sync emails?
Accelo polls Microsoft 365 for new emails on a regular basis. Typical sync time is 15 minutes.
To significantly reduce the amount of time which it takes to sync your email with Accelo, we recommend forwarding your email through Accelo.
What if I have sensitive emails that I don't want to sync?
Accelo offers a robust set of email privacy tools to ensure that your private messages remain private. Check out our email privacy guide for more information.
Where can I view my emails in Accelo?
Accelo will automatically store your emails under the relevant company and contact, in their Stream. The easiest way to view all of your messages is via the Inbox.
Setting up forwarding rules in Microsoft 365
Using forwarding rules is recommended if you plan to manage your email from Accelo.
While the use of forwarding rules aren't necessary for the Microsoft 365 integration to sync emails, they are a great way to speed up the syncing process. This is critical if you plan to use Accelo as your primary tool for sending and reading email, to ensure that your email appears in real-time.
IMPORTANT: Before you get started - check your Outbound Spam Filter settings (IMPORTANT)
Once you've confirmed your spam policies in Microsoft 365 (see the link above!) aren't going to block emails being forwarded to Accelo, you're good to continue. There are two types of rules that we'll need to set up: outbound rules and inbound rules.
Forwarding your outgoing, sent email:
To instantly capture your sent emails in Accelo, you'll be setting up outbound routing rules in Microsoft 365. To set up these rules, you must first have access to an Microsoft 365 Global Administrator account, as you will need access to the Admin Portal.
-
From the Admin Portal, scroll down in the left-hand navigation, then click on the Exchange tab.

-
This will direct you to the Exchange Admin Center. From here, navigate to the mail flow section, then select the rules option.

-
Next, click the plus sign to open a dropdown, then select the Create a new rule... option.

-
After giving the rule a name, select the dropdown in the *Apply this rule if... section. Here, select The sender is a member of... option, then select the members of your staff who this rule will be applied to.

-
Next, in the *Do the following... dropdown, select the BCC the message to... option. Here, you will add your specific [email protected] address as the recipient.

-
Click Save on the modal.
Forwarding your incoming, received email:
A similar process can be used to capture your incoming email by creating inbound forwarding rules in Microsoft 365. Any Microsoft 365 user can set up these forwarding rules for their own account, or a Global Administrator can create inbound forwarding rules on behalf of all users, via the Admin Portal.
For Administrators:
-
From the Admin Portal, scroll down in the left-hand navigation, then click on the Exchange tab.
-
This will direct you to the Exchange Admin Center. From here, navigate to the mail flow section, then select the rules option.
-
Next, click the plus sign to open a dropdown, then select the Create a new rule... option.
-
After giving the rule a name, select the dropdown in the *Apply this rule if... section. Here, select The recipient is a member of... option, then select the members of your staff who this rule will be applied to.
-
Next, in the *Do the following... dropdown, select the BCC the message to... option. Here, you will add your specific [email protected] address as the recipient.
-
Click Save on the modal.
For end users:
-
From your Microsoft 365 account, access your Outlook account by clicking on the Outlook option.
-
Once in Outlook, click the gear icon in the top navigation, then click the View all Outlook settings option.

-
In the Settings window, click the Forwarding tab. Select Enable Forwarding, and in the Forward my email to: field, enter your Accelo capture address.

-
When complete, click Save.
Syncing your Microsoft 365 calendar with Accelo
Bill your clients for all of your meetings, ensure that your schedule is accurate when planning new projects and never miss another meeting using the calendar sync. The calendar sync will pull all of your meetings and appointments from Microsoft 365, displaying them on your schedule in Accelo and automatically linking client meetings to the relevant company and contact.
To enable the calendar sync, simply switch the Calendar Sync setting on.

Where can I view my calendar?
Accelo will automatically store your meetings under the relevant company and contact. You can view your full schedule in the My Schedule tool.
What does Accelo do with internal meetings?
Internal meetings, or meetings which only include you (such as reminders you've created for yourself) will be imported as External Events. External Events are only visible to you, but can be easily converted into meetings which you can log your notes and time for. Check out our guide to External Events for more information.
What's the difference between Client Meetings, Non-Client Meetings and Appointments?
Client Meetings are events which include at least one of your Accelo contacts, while non-client meetings do not. Appointments are events which only include you, such as a reminder or a block of unavailable time.
Can I schedule meetings from Accelo?
Yes! Simply create a Meeting in Accelo with your clients and colleagues as normal, and it will appear in your Microsoft 365 calendar.
How often does Accelo sync with my calendar?
Accelo polls your Microsoft 365 calendar on a regular basis. Typical sync time is 15 minutes.
How can I link my calendar events to specific pieces of work?
By default, Accelo will link your meetings to the company and contact which you'll be meeting with, since it doesn't know which piece of work work it relates to. To link your meeting to a specific sale, project or other piece of work, simply incldue that work's Accelo alias (e.g. [email protected]) as an attendee.

Please note that the Accelo alias must be used on the creation of the meeting to link it to a sale, project, ticket or retainer. Editing an existing meeting and adding the alias will not link the meeting retroactively.
Syncing your contacts with Accelo
The contact sync makes it easy for you and your colleagues to keep your contacts in sync between Accelo and Microsoft 365. The sync is bi-directional, automatically syncing new and updated contacts between your Accelo and Microsoft 365 accounts.
To enable the contact sync, simply switch the Contact Sync settings on.

What contact information syncs between Accelo and Microsoft 365?
The contact sync includes the following information:
|
Accelo Field |
Microsoft 365 Field |
|
First Name |
First Name |
|
Middle Name |
Middle Name |
|
Last Name |
Surname |
|
Title |
Title |
|
Company Name |
Company |
|
Contact Comments |
Notes |
|
|
Email Address |
|
Phone |
Phone |
|
Mobile |
Mobile/Cell |
|
Job Title |
Job Title |
|
Physical Address |
Business Address |
Which contacts are synced?
The Microsoft 365 integration offers two settings to control which contacts it syncs. The Sync Contacts setting will only sync contacts in Microsoft 365 which match existing records in Accelo. The Auto-Import Contacts setting will sync any contact in Microsoft 365 which has a first name, last name, email address and company listed.
How can I sync my contacts with my colleagues?
The contact sync automatically syncs all new and updated contacts with all users who have enabled the contact sync, ensuring that all users have access to the same contacts in Accelo and in Microsoft 365.
How often does Accelo sync my contacts?
Contacts are synced in real-time.
Syncing your tasks with Accelo
The task sync makes it easy to keep track of your work both in and out of Accelo by pushing all of the tasks assigned to you in Accelo to Microsoft 365.
To enable the sync of tasks, simply switch the Task Sync setting to on.

What information is included in the task sync?
The task sync includes the following task details:
|
Accelo Field |
Microsoft 365 Field |
|
Task Title |
Subject |
|
Task Description |
Description |
|
Planned Due Date |
Due Date |
|
Status |
Status (Complete or Incomplete) |
Can I create tasks in Microsoft 365 and push them to Accelo?
No. The task sync does not pull new tasks in from Microsoft 365.
How often does Accelo sync my tasks?
Accelo automatically polls Microsoft 365 for new tasks on a regular basis. Typical sync time is 15 minutes.